The complete CI/CD Setup (Part 6 - Pipeline refactoring)
In this series of blog posts I’ll describe how to setup on a small environment a complete Continuous Integration and Continuous Deployment pipeline, which components are required and how to deploy them and how to make this a bit more general for additional applications.
- In the first part I’ve made an overview and described the components that I’ll deploy.
- In the second part we have deployed the components that are required for the pipeline.
- In the third part we have created our first Continuous Integration and Continuous Deployment pipeline
- In the fourth part we have created tests via Postman and executed them automatically after each Deployment
- In the fifth Part we deployed on each new Pull Request an ephemeral environment that gets automatically deleted when the Pull Request gets closed.
- In this part we will refactor the Jenkinsfile to a shared Library to allow other applications that use the same workflow to reuse it.
Shared Libraries
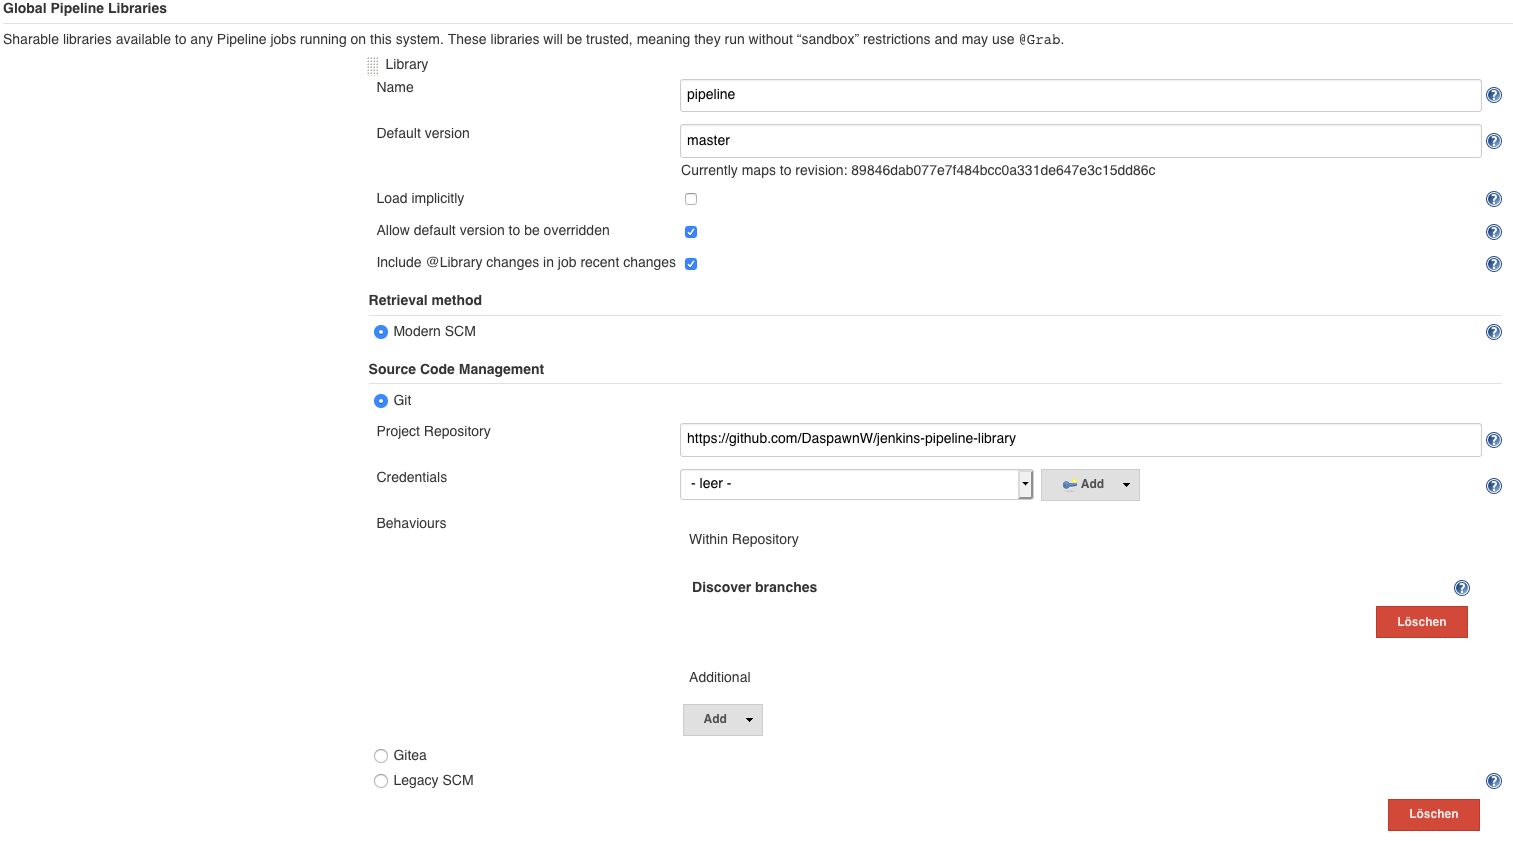
Shared Libraries in Jenkins allow developers to extend the functionality of Jenkinsfiles with new features and help to reuse source code in other pipelines. To configure a shared Library in Jenkins please open the Jenkins settings and there the System Configuration dialog. In the Global Pipeline Libraries configure the URL to a shared Library Git Project:
The Github Library contains all the steps we developed in Parts 3-5 and adds a new step to deploy also additional environments automatically or via manual User interaction on a specific branch. This allows for example an automated deployment to a dev stage when we are on the development branch, an automated deployment to fat on the master branch and a manual deployment to production after the fat deployment to propagate the change to production.
This makes the Jenkinsfile much easier. First we load the pipeline Library we configured as global Library in Jenkins. Then we define some general variables:
@Library("pipeline")_

def postmanTests = true
def postmanPath = "Demo-App-Collection.postman_collection.json"
def stagingBaseUrl = "home.koudingspawn.de";
def stagingVaultPath = "certificates/*.home.koudingspawn.de"
- postmanPath: Defines the path where the postman collection to execute postman tests is stored.
- stagingBaseUrl: Defines the wildcard url that will be used as baseurl
- stagingVaultPath: Defines the path where the SSL certificate is stored in HashiCorp Vault
Next we can define some additional stages that should be deployed automatically as described above:
def stages = [];
stages << new PipelineStage("dev", "spring-boot-dev.home.koudingspawn.de", stagingVaultPath, "development", false)
stages << new PipelineStage("fat", "spring-boot-fat.home.koudingspawn.de", stagingVaultPath, "master", false)
stages << new PipelineStage("prod", "spring-boot.home.koudingspawn.de", stagingVaultPath, "master", true)
The first argument specifies the name of the stage, the second one the url, the third the location where the SSL certificate for TLS termination is stored, the fourth the branch on which the deployment should happen and the last boolean defines if this deployment should happen automatically or requires a user interaction in Jenkins.
The last steps are now to define a PipelineProject that contains all the created information and execute it. To make it more general, also for other programming languages, the build commands and the build Docker image can be specified during the build step.
def project = new PipelineProject(stagingBaseUrl, stagingVaultPath, stages, postmanTests, postmanPath)

execute(pipelineProject: project, buildDockerImage: "maven:3.6-jdk-11-slim", buildCommand: {
    sh("mvn -B clean install")
})
Now the deployment happens as described in the sketch from the first Part.

- A user pushes his source code changes to Git (Gitea). This change triggers a Continuous Integration pipeline running on Jenkins.
- When the user is happy with his change and the pipeline was successful he creates a pull request in Gitea. This pull request triggers again a Continuous Integration pipeline that runs again the build steps, but it also performs several additional steps:
- First it builds a Docker image that contains the source code changes and
- deploys this change to an ephemeral stage on Kubernetes.
- After the deployment is finished a message is written to the pull request to notify that now there is an ephemeral stage available with the source code changes.
- Then additional postman tests are executed to check that the api is still valid.
- After additional developers have reviewed the pull request and accepted the change, it will be merged via Gitea to master branch. This will trigger two Jenkins jobs. The first one will simply delete the ephemeral stage that was generated by the pull request. The second one will run:
- a pipeline that will run again the build and
- also the Docker job to build the required Docker image.
- After this a deployment to a staging environment (in this case FAT) will happen automatically and
- the postman tests are executed again.
- To propagate the change to Production (prod) the user is prompted in Jenkins to proceed the prod deployment. If he accepts this, the deployment will take place on prod and the postman tests will be performed on it again.