The complete CI/CD Setup (Part 2 - The Components)
In this series of blog posts I’ll describe how to setup on a small environment a complete Continuous Integration and Continuous Deployment pipeline, which components are required and how to deploy them and how to make this a bit more general for additional projects.
In the first part I’ve made an overview and described the components that I’ll deploy.
Deploy HashiCorp Vault
As already described in the first part, I’ll deploy HashiCorp Vault on a separate Server, because it is also used to handle Authentication and Authorization to Kubernetes. For more details please also read two of my previous blog posts: How to generate certificates for kubeadm with Vault and Make Kubernetes more secure with HashiCorp Vault
To make this easier I’ve generated an ansible script that handles all the required steps and is available on GitHub. For authentication to the instance I’ve already preconfigured SSH key based authentication to the instance.
After this is done the following steps are required:
- Generate a hosts file that contains the ip address of the Vault host and the username for SSH access:
$ git clone https://github.com/DaspawnW/esxi-vault.git $ cd esxi-vault $ cat <<EOF > hosts [vault] 192.168.178.57 ansible_connection=ssh ansible_user=administrator EOF - Place and generate TLS certificates for encrypted access to HashiCorp Vault. Please see therefore Part 1 of the blog series.
- Run the ansible playbook with the following command:
$ ansible-playbook -i hosts -v -e "ssl_cert_src=/Users/.../fullchain.pem" -e "ssl_key_src=/Users/.../privkey.pem" vault.yml
The following sketch describes the target architecture of HashiCorp Vault:
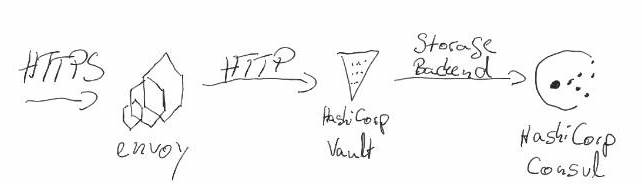
The reason why envoy sits in front of Vault is, that this setup allows a certificate Change without restarting HashiCorp Vault. Because a restart of Vault requires an unsealing Process of Vault. The envoy is configured to detect a certificate change and to perform a hot restart to replace the certificate with the new one. (Vault-CRD-Proxy)
Part of the deployment is a script that generates via cron backups and stores them in a directory called /data/consul/backup. Backups older then 14 day are removed automatically. Something that is not part of this deployment yet is a way to move the backups for example to S3. Also not part of this deployment is an HA Setup of Consul and HashiCorp Vault, for more details on a target Architecture please have a look at the recommendations made by HashiCorp. (Reference architecture)
Now it is time to initialize HashiCorp Vault. Therefore you can use either the UI or the CLI on the terminal. The UI is available in the described setup on port 443. In this post I’ll describe how to unseal and init Vault via command line:
Initialize and Unseal Vault
First of all Vault is sealed, this means you can’t access Vault until it is not unsealed. This prevents access to HashiCorp Vault in case of an attack. Only the unsealing keys are allowed to unseal Vault and applications or users with normal access via token are not able to access it. After the initial deployment the unseal key must be generated:
$ export VAULT_ADDR="https://vault.home.koudingspawn.de"
$ vault operator init
Unseal Key 1: Q62W1JsNyt2pU4KXUDvTQEu2CbXYwPSHBstGKWL19/Wj
Unseal Key 2: 6gOL18ihwl7S8UMHgYAdyG3QjLtGVf1cW9xsP9JYOfHM
Unseal Key 3: tfh4ce6+Wb2S5Vr6VxwFDO19729keHUMQ2CJq0fKNIiQ
Unseal Key 4: 4QsvvM1sZQp+azshZCDyVPCVF2deae7O2Fu7r7aPecZs
Unseal Key 5: m4fF+1I38fBovS2aF2ZYfhYaL0YAqmy30IRd1CUzZISq

Initial Root Token: s.UJQbMzPWYTnUqCMXU62tvcrC

Vault initialized with 5 key shares and a key threshold of 3. Please securely
distribute the key shares printed above. When the Vault is re-sealed,
restarted, or stopped, you must supply at least 3 of these keys to unseal it
before it can start servicing requests.

Vault does not store the generated master key. Without at least 3 key to
reconstruct the master key, Vault will remain permanently sealed!

It is possible to generate new unseal keys, provided you have a quorum of
existing unseal keys shares. See "vault operator rekey" for more information.
Now you can see 5 generated keys and the root token to access HashiCorp Vault. By default Vault generates 5 keys for unsealing and 3 keys must be provided to unseal Vault. You can change this behavior by setting the shares and the required threshold during init.
Now we can unseal Vault to allow our Root Token to access the content:
$ vault operator unseal Q62W1JsNyt2pU4KXUDvTQEu2CbXYwPSHBstGKWL19/Wj
Key                Value
---                -----
Seal Type          shamir
Sealed             true
Total Shares       5
Threshold          3
Unseal Progress    1/3
Unseal Nonce       97b909d9-711d-4d0d-a20c-392e91f9e802
Version            1.0.3
HA Enabled         false

$ vault operator unseal 6gOL18ihwl7S8UMHgYAdyG3QjLtGVf1cW9xsP9JYOfHM
Key                Value
---                -----
Seal Type          shamir
Sealed             true
Total Shares       5
Threshold          3
Unseal Progress    2/3
Unseal Nonce       97b909d9-711d-4d0d-a20c-392e91f9e802
Version            1.0.3
HA Enabled         false

$ vault operator unseal tfh4ce6+Wb2S5Vr6VxwFDO19729keHUMQ2CJq0fKNIiQ
Key             Value
---             -----
Seal Type       shamir
Sealed          false
Total Shares    5
Threshold       3
Version         1.0.3
Cluster Name    vault-cluster-892dd3b6
Cluster ID      a0014a66-0995-b0d8-0d1a-83f1fae37c3c
HA Enabled      false
Now you can see that the operator is unsealed:
$ vault status
Key             Value
---             -----
Seal Type       shamir
Sealed          false
Total Shares    5
Threshold       3
Version         1.0.3
Cluster Name    vault-cluster-892dd3b6
Cluster ID      a0014a66-0995-b0d8-0d1a-83f1fae37c3c
HA Enabled      false
For our setup we will generate two secret engines that are used later for sharing secrets with our applications and for sharing certificates with the Ingress Controller:
$ export VAULT_TOKEN="s.UJQbMzPWYTnUqCMXU62tvcrC"
$ vault secrets enable -version=1 -path=certificates kv
$ vault secrets enable -version=1 -path=kubernetes-secrets kv
Place Wildcard Let’s Encrypt certificate in Vault
Now we can place our Wildcard Let’s Encrypt certificate in HashiCorp Vault:
$ cat <<EOF > output.json
{
  "data": {
    "certificate": "$(cat fullchain.pem | perl -pe 's/\n/\\n/g')",
    "issuing_ca": "$(cat chain.pem | perl -pe 's/\n/\\n/g')",
    "private_key": "$(cat privkey.pem | perl -pe 's/\n/\\n/g')"
  }
}
EOF
$ vault write "certificates/*.home.koudingspawn.de" @output.json
$ vault read "certificates/*.home.koudingspawn.de"
Install Helm (Tiller) on Kubernetes
As already said I’m not such a big fan of Helm, because Helm itself uses on Server side a tool called Tiller. This one will be placed in Kubernetes and handles the deployment of so called charts. If Helm is not on a namespace basis it has full cluster access. And also the typical helm init setup is not secure, as I’m not a big Fan I’m also not a good guy to tell you how to setup Helm securely. Securing Installation
Another solution of Helm setup is to use Helm only as templating engine and apply the manifests via kubectl. With Helm 3 (currently in alpha) there is a new solution where the installation of charts happens Tillerless. I think this new approach is a big security improvement and makes me think about wheter in the future I will use helm.
Here I’ll describe my Helm setup, as already said, I think it is not secure because I’ve a missing part the tls encrypted communication between Tiller and Helm-CLI.
apiVersion: v1
kind: ServiceAccount
metadata:
  name: tiller
  namespace: kube-system
---
apiVersion: rbac.authorization.k8s.io/v1beta1
kind: ClusterRoleBinding
metadata:
  name: tiller
roleRef:
  apiGroup: rbac.authorization.k8s.io
  kind: ClusterRole
  name: cluster-admin
subjects:
- kind: ServiceAccount
  name: tiller
  namespace: kube-system
$ helm init --service-account tiller
Now Helm is running and the installation of the following components is much easier.
Setup Vault-CRD to sync secrets with Kubernetes
Vault-CRD is an open source tool I’ve developed to share secrets stored in HashiCorp Vault with Kubernetes. It detects changes in Vault and syncs them to Kubernetes as secrets. In the Continuous Deployment step we will use it to prevent storing secrets in Kubernetes manifest files in git.
Preparation
To prepare the deployment first we must configure Kubernetes and write some policies to HashiCorp Vault to allow Vault-CRD to access Vault:
$ kubectl create serviceaccount vault-auth
$ cat <<EOF | kubectl apply -f -
apiVersion: rbac.authorization.k8s.io/v1beta1
kind: ClusterRoleBinding
metadata:
  name: role-tokenreview-binding
  namespace: default
roleRef:
  apiGroup: rbac.authorization.k8s.io
  kind: ClusterRole
  name: system:auth-delegator
subjects:
- kind: ServiceAccount
  name: vault-auth
  namespace: default
EOF
The first part generates a ServiceAccount called vault-auth that is allowed to validate JWTokens of other ServiceAccounts. Later Vault-CRD will try to authenticate to Vault via its own ServiceAccount, to allow Vault to validate this account it must have access to Kubernetes. Therefore we must configure now Vault to know how to access the Cluster:
$ vault auth enable kubernetes
$ vaultSecretName=$(kubectl get serviceaccount vault-auth -o json | jq '.secrets[0].name' -r)
$ kubectl get secret $vaultSecretName -o json | jq '.data["ca.crt"]' -r | base64 -D > ca.crt
$ vault write auth/kubernetes/config \
    token_reviewer_jwt="$(kubectl get secret $vaultSecretName -o json | jq .data.token -r | base64 -D)" \
    kubernetes_host=https://192.168.178.59:6443 \
    [email protected]
Now Vault knows how to access Kubernetes and how to authenticate itself and validate other ServiceAccounts. The last step configures Vault to allow Vault-CRD to access the secrets stored in Vault:
$ cat <<EOF >policy.hcl
path "kubernetes-secrets/*" {
  capabilities = ["read"]
}
path "certificates/*" {
  capabilities = ["read"]
}
EOF
$ vault write sys/policy/kubernetes-secrets [email protected]
$ vault write auth/kubernetes/role/vault-crd-auth \
    bound_service_account_names=vault-crd-serviceaccount \
    bound_service_account_namespaces=vault-crd \
    policies=kubernetes-secrets \
    ttl=1h
The policy generated in the code block allows access on the two key-value stores already configured in the step of setting up HashiCorp Vault.
Deploy Vault-CRD
The deployment of Vault-CRD is now the first Helm Chart we are using:
$ git clone https://github.com/DaspawnW/vault-crd-helm.git vault-crd
$ helm install --name vault --namespace vault-crd ./vault-crd \
    --set vaultCRD.vaultUrl=https://vault.home.koudingspawn.de/v1/ \
    --set vaultCRD.vaultAuth=serviceAccount \
    --set vaultCRD.vaultRole=vault-crd-auth
Deploy NGINX Ingress Controller
The next component is the NGINX Ingress Controller that is a Kubernetes based reverse proxy to manage access to applications running in Kubernetes and to handle TLS termination. In this setup I’ll deploy it only with a replica of 1, in a production ready deployment Ingress will be deployed typically multiple times. The deployment happens again via a Helm Chart:
$ helm install stable/nginx-ingress \
    --name ingress \
    --namespace nginx-ingress \
    --set controller.replicaCount=1 \
    --set controller.service.type=NodePort \
    --set controller.service.nodePorts.http=32080 \
    --set controller.service.nodePorts.https=32443
$ kubectl get pods -n nginx-ingress
NAME                                                    READY   STATUS    RESTARTS   AGE
ingress-nginx-ingress-controller-c6d5484d9-rt5nk        1/1     Running   0          8d
ingress-nginx-ingress-default-backend-c46fbc444-6qsk6   1/1     Running   0          8d
Now the Ingress Controller will be deployed and listens on the Worker nodes on port 32080 and 32443 for HTTP and HTTPS traffic. As a hack to make this also available on Port 80 and 443 I’ll deploy a small Docker container on all worker nodes that forwards traffic on 443 to 32443 and traffic on 80 to 32080. This setup is for my small home server, if you are working in the Cloud it is recommend to have a look at the LoadBalancer Service Type, most managed Kubernetes setups are configured to generate in such a case a LoadBalancer and forward the traffic to the correct ports.
$ mkdir -p /data
$ cat <<EOF >/data/nginx.conf
events {
  worker_connections  1024;
}

stream {
    server {
        listen 443;

        proxy_pass 127.0.0.1:32443;
    }
    server {
        listen 80;
        proxy_pass 127.0.0.1:32080;
    }
}
EOF
$ docker run --name https-proxy -d -p 443:443 -p 80:80 --network="host" -v /data/nginx.conf:/etc/nginx/nginx.conf:ro nginx:1.15-alpine
Persistent Volumes with Rook
Three of the deployed components (Gitea, Jenkins and Docker Registry) require Persistent Volumes, otherwise your stored data will be deleted when a pod crashs or gets evicted. Rook is an incubator project of the Cloud Native Computing Foundation and makes Persistent Volumes very easy. It deploys a Ceph Cluster over all Worker Nodes and in case of a Node failure the data is replicated to other Nodes.
$ kubectl apply -f https://raw.githubusercontent.com/rook/rook/release-1.0/cluster/examples/kubernetes/ceph/common.yaml
$ kubectl apply -f https://raw.githubusercontent.com/rook/rook/release-1.0/cluster/examples/kubernetes/ceph/operator.yaml
apiVersion: ceph.rook.io/v1
kind: CephCluster
metadata:
  name: rook-ceph
  namespace: rook-ceph
spec:
  cephVersion:
    image: ceph/ceph:v14.2.1-20190430
  dataDirHostPath: /data/rook
  mon:
    count: 3
  dashboard:
    enabled: true
  storage:
    useAllNodes: true
    useAllDevices: false
    directories:
    - path: /data/rook
In my case the Intel NUC has two hard drive, one for the operating system and one for data. In the scripts rook will be deployed to uses the “/data/rook”-directory on the Worker Nodes, which is the mount point for the data hard drive.
Now we can configure our CephCluster to replicate data over the nodes (in this case over 3 nodes) and configure a new Kubernetes StorageClass called rook-ceph-block. After this we are able to generate Persistent Volume Claims with this StorageClass and Rook will handle the provisioning of Volumes. In my example I’ll configure a reclaim Policy of Retain this means, when the Persistent Volume Claim gets deleted the Persistent Volume itself will stay and no data gets lost.
apiVersion: ceph.rook.io/v1
kind: CephBlockPool
metadata:
  name: replicapool
  namespace: rook-ceph
spec:
  failureDomain: host
  replicated:
    size: 3
---
apiVersion: storage.k8s.io/v1
kind: StorageClass
metadata:
   name: rook-ceph-block
provisioner: ceph.rook.io/block
parameters:
  blockPool: replicapool
  clusterNamespace: rook-ceph
  fstype: ext4
reclaimPolicy: Retain
Deploy Gitea
Now we have all the required things to deploy Gitea for Source Code Management. Gitea itself uses Postgres as database, this will be automatically provisioned via the Helm chart. You are also able to use your own Postgres and configure only the connection String with username and password to connect Gitea to Postgres. In my example I’ll provision Postgres via the Helm Chart dependency.
$ secretName="git-home-koudingspawn-de"
$ namespace="gitea"
$ domain="git.home.koudingspawn.de"

$ helm upgrade --install gitea --namespace ${namespace} ./gitea \
    --set service.gitea.serverDomain="${domain}" \
    --set service.gitea.serverRootUrl="https://${domain}/" \
    --set service.ingress.annotations."kubernetes\.io/ingress\.class"=nginx \
    --set service.ingress.hosts[0]="${domain}" \
    --set service.ingress.tls[0].hosts[0]=${domain} \
    --set service.ingress.tls[0].secretName=${secretName} \
    --set persistence.storageClass=rook-ceph-block \
    --set persistence.size=15Gi \
    --set postgresql.persistence.storageClass=rook-ceph-block
First interresting thing is, we are now using our previously generated rook-ceph-block StorageClass to provision two persistent Volumes (one for Postgres Database and one for Gitea itself). To allow users to access Gitea from outside the Kubernetes Cluster we configure also ingress. The annotation kubernetes.io/ingress.class=nginx tells our previously generated Nginx Ingress Controller to handle this ingress resource. By default Nginx Ingress is configured to only handle Ingress resources with “nginx” as ingress class. If you have more then one Ingress Controller it is required to configure different Ingress Classes to be able to distinguish which resource should be assigned to which controller.
We also configure tls for the Ingress Controller, as you maybe see, currently there is no such secret available to handle TLS Terminiation. Therefore we will also apply a Vault-CRD Resource to share the certificate we stored in one of our previous steps in Vault with our Cluster:
apiVersion: "koudingspawn.de/v1"
kind: Vault
metadata:
  name: git-home-koudingspawn-de
  namespace: gitea
spec:
  path: "certificates/*.home.koudingspawn.de"
  type: "CERT"
Now Vault-CRD detects this resource and will share the certificate stored in path certificates/*.home.koudingspawn.de with the Cluster. After this you should be able to access Gitea. How to configure Gitea I’ll show you in Part 3 and also how to configure a Continuous Integration and Continuous Deployment Pipeline when new commits are pushed to Gitea.
Deploy Jenkins
But first we must also deploy Jenkins, because it will receive hooks when new commits are pushed to Gitea, build and deploy the applications. Therefore we can use again a Helm Chart, that is configured to use Kubernetes to start Agents:
$ domain="jenkins.home.koudingspawn.de"
$ secretName="jenkins-home-koudingspawn-de"
$ namespace="jenkins"


$ helm upgrade --install jenkins --namespace="${namespace}" \
    --set rbac.create=true \
    --set master.serviceType=ClusterIP \
    --set master.ingress.enabled=true \
    --set master.ingress.hostName="${domain}" \
    --set master.ingress.annotations."kubernetes\.io/ingress\.class"=nginx \
    --set master.ingress.tls[0].hosts[0]="${domain}" \
    --set master.ingress.tls[0].secretName="${secretName}" \
    --set persistence.size=20Gi \
    --set persistence.storageClass=rook-ceph-block \
    --set master.installPlugins[0]="kubernetes:1.15.5" \
    --set master.installPlugins[1]="workflow-job:2.32" \
    --set master.installPlugins[2]="workflow-aggregator:2.6" \
    --set master.installPlugins[3]="credentials-binding:1.19" \
    --set master.installPlugins[4]="git:3.10.0" \
    --set master.installPlugins[5]="gitea:1.1.2" \
    --set master.installPlugins[6]="simple-theme:1.1.2" \
    --set master.installPlugins[7]="generic-webhook-trigger:1.54"
    stable/jenkins
For Ingress configuration we are doing the same thing as for Gitea and we also configure rook-ceph-block as StorageClass for configuration, Jobs and logs. Now we can again share the Certificate stored in Vault with Kubernetes via Vault-CRD:
apiVersion: "koudingspawn.de/v1"
kind: Vault
metadata:
  name: jenkins-home-koudingspawn-de
  namespace: jenkins
spec:
  path: "certificates/*.home.koudingspawn.de"
  type: "CERT"
After this you should be able to access now Jenkins. The default user is admin and the password is stored in a Kubernetes Secret we can read from:
$ printf $(kubectl get secret --namespace jenkins jenkins -o jsonpath="{.data.jenkins-admin-password}" | base64 --decode);echo
Docker Registry v2 to store generated Docker images
The last required component for our small Setup is a Docker Registry. We will simply use the registry provided by Docker, but it is also possible to use another one. We are configuring the Registry with a simple username and password, but together with an authentication Service it is also possible to do Authentication based on LDAP or something else. For now we are also not deploying a UI for the registry, so every maintainance must be done via CLI or HTTP.
First we must generate via htpasswd a flat format to store username and password for basic authentication, therefore we can use the commandline tool htpasswd:
$ htpasswd -nbB administrator verysecurepassword
administrator:$2y$05$1EweB1WxKc0lKjCSo/59WulX8JjFQBa254pD2rlopBCp/nl61yEIW
Now we can start our Registry as Helm Chart and use the generated htpasswd username and password in it:
namespace="registry"
domain="registry.home.koudingspawn.de"
secretName="registry-home-koudingspawn-de"

helm upgrade --install registry --namespace ${namespace} \
    --set persistence.enabled=true \
    --set persistence.storageClass=rook-ceph-block \
    --set persistence.size=20Gi \
    --set secrets.htpasswd='administrator:$2y$05$1EweB1WxKc0lKjCSo/59WulX8JjFQBa254pD2rlopBCp/nl61yEIW' \
    --set ingress.enabled=true \
    --set ingress.annotations."kubernetes\.io/ingress\.class"=nginx \
    --set ingress.annotations."nginx\.ingress\.kubernetes\.io/proxy-body-size"=100m \
    --set ingress.hosts[0]="${domain}" \
    --set ingress.tls[0].hosts[0]=${domain} \
    --set ingress.tls[0].secretName=${secretName} \
    stable/docker-registry
Because Docker Image Layers are sometimes very Large we add a specific annotation to configure our NGINX Ingress Controller to allow requests with about 100 MB of Body size. If you have larger Layers you maybe should increase the value to prevent exceptions during docker push command.
To finish the NGINX Ingress configuration, we must sync again the certificate stored in HashiCorp Vault with our Kubernetes Cluster, in this case we must store it in the registry namespace:
apiVersion: "koudingspawn.de/v1"
kind: Vault
metadata:
  name: registry-home-koudingspawn-de
  namespace: registry
spec:
  path: "certificates/*.home.koudingspawn.de"
  type: "CERT"
To allow our Jenkins to use the Registry Credentials to push or load image Layers from the Registry we must store the Registry Credentials also in Vault and share them with our Kubernetes Cluster. If we change the password for the registry once in the future, thanks to Vault-CRD we only need to update it in the Vault and Jenkins automatically receives the updated version.
$ vault write kubernetes-secrets/registry-credentials username=administrator password=verysecurepassword url=registry.home.koudingspawn.de [email protected]
apiVersion: "koudingspawn.de/v1"
kind: Vault
metadata:
  name: registry-credentials
  namespace: jenkins
spec:
  path: "kubernetes-secrets/registry-credentials"
  type: "KEYVALUE"
Next steps
In Part 3 of the series on how to setup a Continuous Integration and Continuous Deployment pipeline we will configure Jenkins and Gitea to talk to each other and also start developing our Pipeline.