Spinnaker Red-Black Deployment
In one of my previous posts I wrote an application that converts images to be smaller. In this tutorial I’ll use this simple Spring Boot application to demostrate how Red-Black Deployments in Spinnaker work.
First of all I’ll show how to setup Spinnaker. I think it is a bit tricky to get Spinnaker running, first tests with Redis as Storage failed for me after some time. I think the Redis integration is a bit frustrating and feels like Alpha support. So I’ll use the minio integration and this is very cool and works well.
How to install Spinnaker
The Spinnaker installation guide describes that it is recommended to use an ubuntu 14.04. After you have a running environment first please install halyard. This tool is required to configure your future deployment environment:
curl -O https://raw.githubusercontent.com/spinnaker/halyard/master/install/stable/InstallHalyard.sh

sudo bash InstallHalyard.sh
After this halyard is installed and you can configure spinnaker to communicate to kubernetes cluster, specify the persistent storage (s3 minio) and the registry where the containers are located. First we start with the persistent storage:
hal config storage s3 edit --access-key-id <access-key> --secret-access-key --bucket spinnaker --endpoint http://localhost:9001
hal config storage edit --type s3
The first config command expects that there is a running minio on the local machine. In my case there is a minio at port 9001, it is configured with a fixed access key and secret access key, otherwise you have to use the one that is randomly generated on startup. You will be prompted to set the secret access key.
The second command then specifies that s3 should be used as storage type.
Now we can connect Spinnaker/halyard to our docker registry. This is required because spinnaker generates in each namespace a pull secret to download docker containers from your registry. Spinnaker also supports automated triggers, in this case spinnaker pulls for newly generated docker images.
hal config provider docker-registry enable
hal config provider docker-registry account add gitlab-com --address registry.gitlab.com --username <username> --repositories <groupname>/<imagename> --password
As already described for the configuration of s3, while adding the gitlab-com docker registry you are prompted to enter the password for the registry.
The last configuration step is to configure the access of spinnaker/halyard to the kubernetes cluster. Therefore we place a .kube-config file and say halyard where it is located to connect to kubernetes. We also connect the kubernetes account to the docker registry for the pull secrets.
hal config provider kubernetes enable
hal config provider kubernetes account add kube-cluster --docker-registries gitlab-com --kubeconfig-file /home/ubuntu/.kube/kube-admin.yml
Now we can deploy the spinnaker microservices by setting a spinnaker version and deploying them:
hal version list
hal config version edit --version 1.5.1

hal deploy apply
The first command lists all available versions of Spinnaker and with the second command you can set one of the available Spinnaker versions to be installed. In the last step we deploy spinnaker. After a couple of time there should be a running Spinnaker available.
Logs to see if something went wrong are available via tail -f /var/log/spinnaker/*/*.log.
Now you should be able to open spinnaker via browser on port 9000. In my case I run SSH to get access to the required ports:
ssh -L 9000:localhost:9000 -L 8084:localhost:8084 ubuntu@<ip>
How to deploy a simple application with Continuous Delivery
The first part is to generate an application and create a “Load Balancer”. Therefore please go to “Applications” and click on “New Application”. This should open a modal where you can specify the name of the application and an email address. After creating this one click on the newly generated application, this will open a detail page with “Pipelines”,”Clusters”,”Load Balancers”…
Please click on Load Balancers and create one new Load Balancer. In Kubernetes speech a Load Balancer is a service.
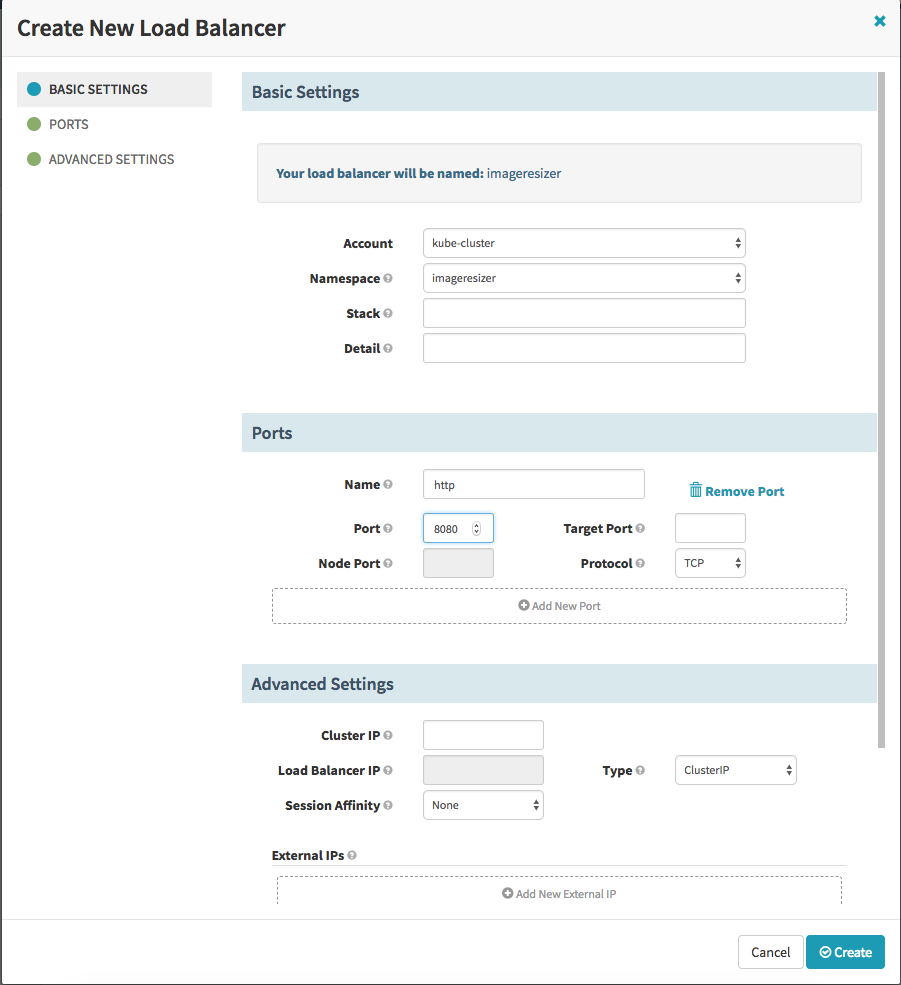
First we specify a name of the load balancer (service) and a namespace where it should be placed and after this we specify the port mapping. Here we specify port 8080, as port for incomming requests and because we don’t specify the target port it is the same (8080). After we created the Load Balancer we should see in our namespace one new Service.
$ kubectl describe service imageresizer -n imageresizer
Name:              imageresizer
Namespace:         imageresizer
Labels:            <none>
Annotations:       <none>
Selector:          load-balancer-imageresizer=true
Type:              ClusterIP
IP:                10.98.216.250
Port:              http  8080/TCP
TargetPort:        8080/TCP
Endpoints:
Session Affinity:  None
Events:            <none>
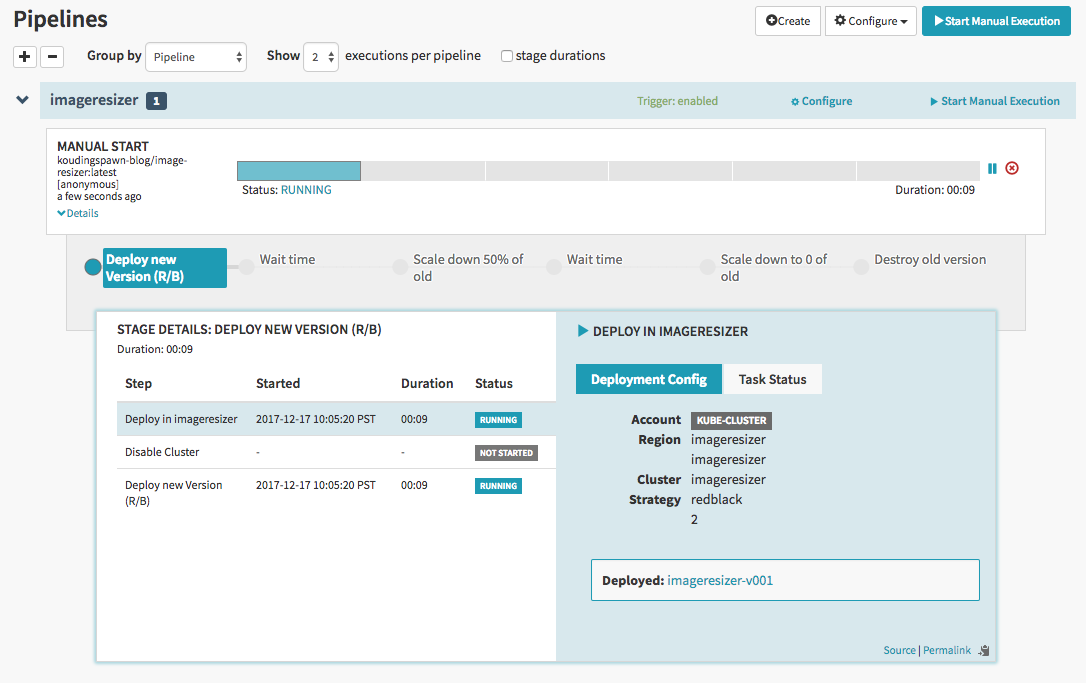
Now we can generate a deployment pipeline. In this case the pipeline looks as follows:
We generate two new pods of the new image and place them next to the old one. After they are available we remove the old version of the deployment from the load balancer and wait some minutes. If everything looks good we will shutdown one of the old pods and after some additional time we remove the last old pod and delete the old replicaset.
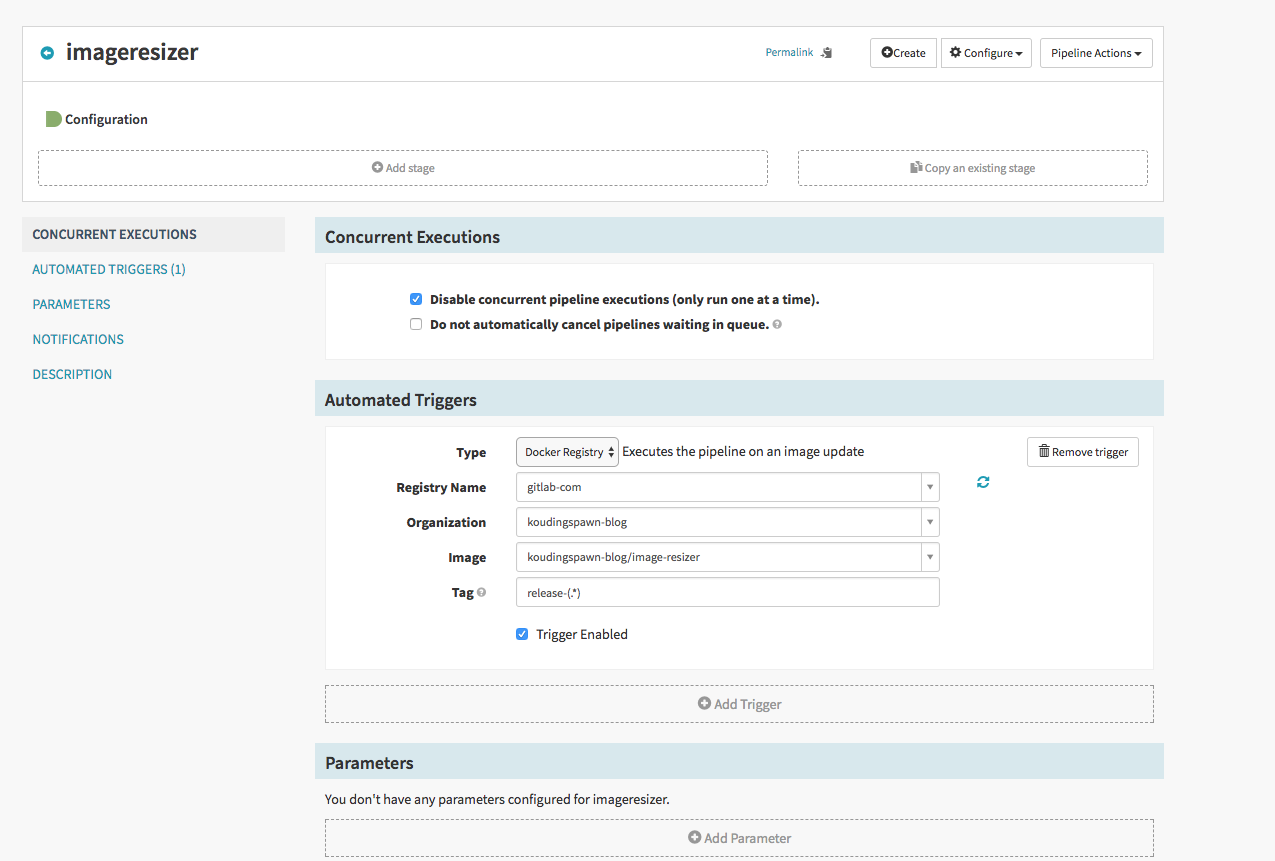
First step is to specify which action should trigger this pipeline, here we specify that a newly generated docker image, that has the regex release-.* should run through the pipeline:
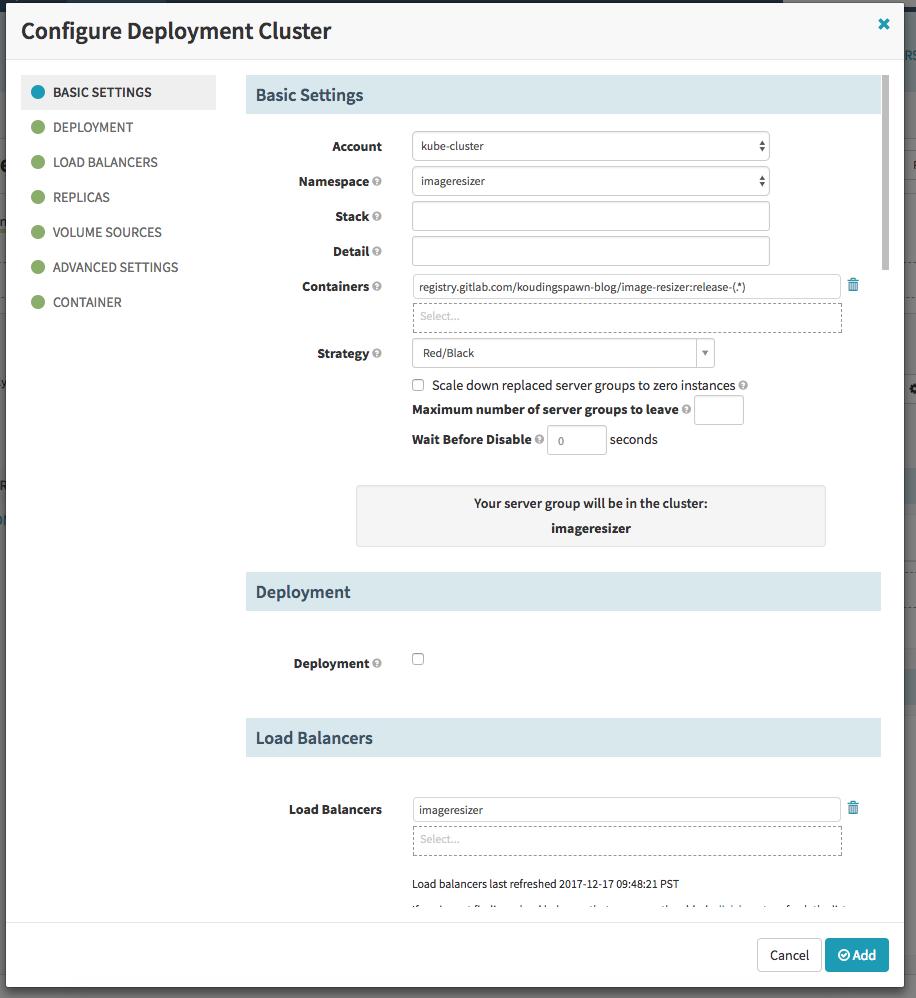
After this we can add a new stage of type Deployment and add a configuration to it. The configuration is the same as we do it in yaml. Please specify here that we will use Red/Black as Strategy.
Now we can add a new pipeline step (add stage) that waits some time and after this one step that reduces the cluster size of the old replicaset and as already described then again one waiting step and one resize and one step to destroy the old server group.
What happens at a deployment?
The first part is that spinnaker will generate a new replicaset next to the old one with two pods
$ kubectl get rs -n imageresizer
NAME                DESIRED   CURRENT   READY     AGE
imageresizer-v001   2         2         2         6m
imageresizer-v002   2         2         0         10s

$ kubectl get pods -n imageresizer
NAME                      READY     STATUS    RESTARTS   AGE
imageresizer-v001-lz6pf   1/1       Running   0          7m
imageresizer-v001-xgpv4   1/1       Running   0          7m
imageresizer-v002-4cn2n   0/1       Running   0          34s
imageresizer-v002-mlprs   0/1       Running   0          34s
After the pods are available and healthy spinnaker will move the load balancer to point only to the new version of the application. In the first seconds both versions of the application are available:
$ kubectl describe service imageresizer -n imageresizer
Name:              imageresizer
Namespace:         imageresizer
Labels:            <none>
Annotations:       <none>
Selector:          load-balancer-imageresizer=true
Type:              ClusterIP
IP:                10.98.216.250
Port:              http  8080/TCP
TargetPort:        8080/TCP
Endpoints:         10.244.1.64:8080,10.244.2.60:8080,10.244.2.59:8080,10.244.1.63:8080
Session Affinity:  None
Events:            <none>
After the move to the new version, only the new endpoints are available:
$ kubectl describe service imageresizer -n imageresizer
Name:              imageresizer
Namespace:         imageresizer
Labels:            <none>
Annotations:       <none>
Selector:          load-balancer-imageresizer=true
Type:              ClusterIP
IP:                10.98.216.250
Port:              http  8080/TCP
TargetPort:        8080/TCP
Endpoints:         10.244.1.65:8080,10.244.2.59:8080
Session Affinity:  None
Events:            <none>
The rest of the pipeline is easy to understand, first it will remove one container of the old version:
$ kubectl get pods -n imageresizer
NAME                      READY     STATUS    RESTARTS   AGE
imageresizer-v001-lz6pf   1/1       Running   0          10m
imageresizer-v002-4cn2n   1/1       Running   0          3m
imageresizer-v002-mlprs   1/1       Running   0          3m
One nice feature is, if the old version of the replicaset stil exist, it is possible to do a rollback. Therefore you can click on the cluster tab and on the old replicaset. In the “Server Group Actions”-context-menu you can do a “rollback” to the old version of the application if something went wrong:

How the red-black deployment work
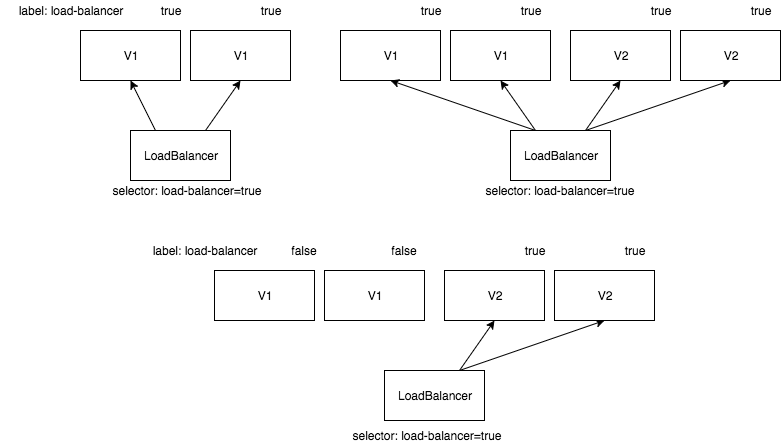
As you can see in the diagram first there are only two pods of the old application version. They are marked with a load-balancer-<applicationname>=true-label. The Load Balancer itself has a selector for pods with this label.
If we do a new deployment two new pods of the new application version will be added. After they are healthy they will receive traffic from the load balancer, because they have also the load-balancer-<applicationname>=true label.
In the labels of the old application version will be switched from load-balancer-<applicationname>=true to load-balancer-<applicationname>=false. This will remove them from the load balancer because the selector searches for pods with a true value in the load-balancer label.
A rollback to the old version is very easy, first we add again the load-balancer-<applicationname>=true label to the old version of the application and then we switch the value of the label for the new version to false.