Setup a free Kubernetes Cluster
The entry into development with Kubernetes can be difficult. First we need a cluster that runs solid and components like flannel and kube-dns must run correct. One easy way to do this is to use kubeadm but what if you have no Baremetal or Cloud Server available to deploy kubeadm? What about lets do it and not, hey lets setup a cluster in two hours and after this my free time is over :-(.
One easy way I found is to use IBM Bluemix, it offers a free Kubernetes Cluster with one node. The registration process is very easy and fast there is no credit card required.
Connect to the cluster
After registration there is a catalog of applications available in the bluemix console:
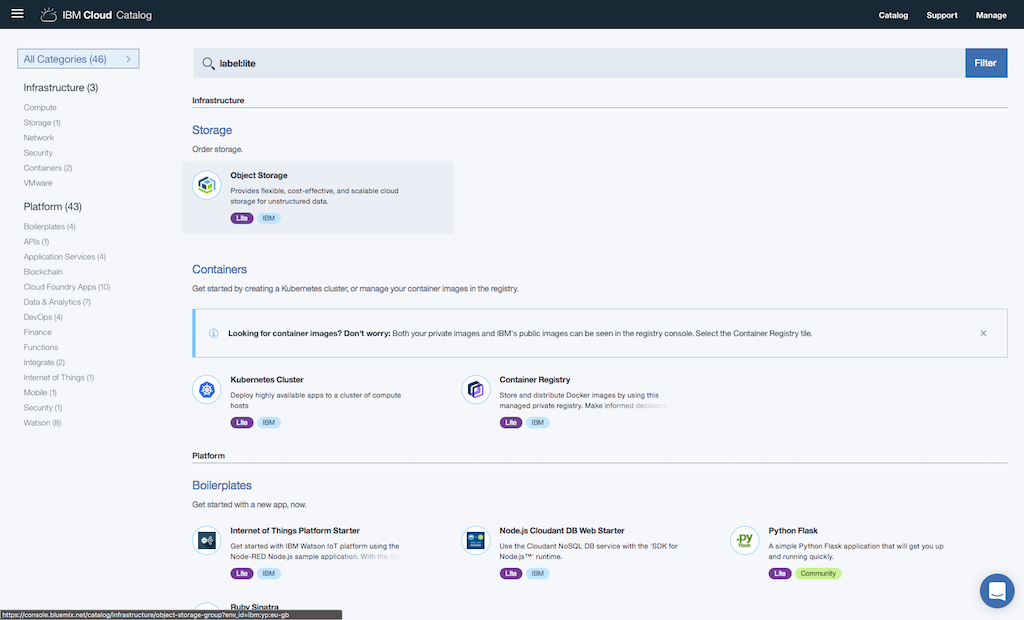
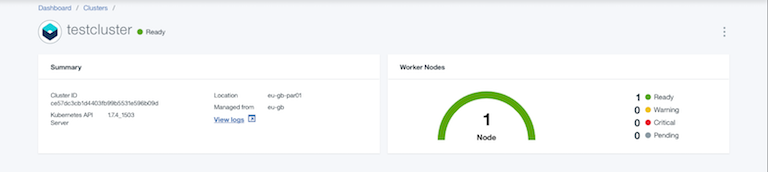
If you click on Kubernetes Cluster you can select the Lite plan. In the Lite plan there is a 1 worker node Kubernetes cluster with 4GB memory included. After naming the cluster and saving the cluster will be generated. This take some time, but after this you will see a Kubernetes cluster running with Kubernetes 1.7.4.
To access the cluster we need to install the IBM Cloud CLI available on the reference page: bluemix cli. After installation a plugin for container-services must be installed:
$ bx plugin install container-service -r Bluemix
Looking up 'container-service' from repository 'Bluemix'...
Plug-in 'container-service 0.1.376' found in repository 'Bluemix'
Attempting to download the binary file...
 19.33 MiB / 19.33 MiB [==========================================================================================================================================] 100.00% 51s
20267440 bytes downloaded
Installing binary...
OK
Plug-in 'container-service 0.1.376' was successfully installed into /Users/user/.bluemix/plugins/container-service. Use 'bx plugin show container-service' to show its details.
Now we can login to the bluemix api via cli:
$ bx login -a https://api.eu-gb.bluemix.net
API endpoint: https://api.eu-gb.bluemix.net

Email> <user-email>

Password>
Authenticating...
OK

Select an account (or press enter to skip):
1. Username's Account (cd91bbf9ac631b390285dc10cb2f03fb)
Enter a number> 1
Targeted account Username's Account (cd91bbf9ac631b390285dc10cb2f03fb)

Targeted resource group Default


API endpoint:     https://api.eu-gb.bluemix.net (API version: 2.92.0)
Region:           eu-gb
User:             user-email
Account:          Username's Account (accountid)
Resource group:   Default
Org:
Space:

Tip: If you are managing Cloud Foundry applications and services
- Use 'bx target --cf' to target Cloud Foundry org/space interactively, or use 'bx target -o ORG -s SPACE' to target the org/space.
- Use 'bx cf' if you want to run the Cloud Foundry CLI with current Bluemix CLI context.
The last step before we can access the kubernetes cluster is to download the kubernetes configuration to access the cluster from local:
$ bx cs cluster-config <clustername>
OK
The configuration for testcluster was downloaded successfully. Export environment variables to start using Kubernetes.

export KUBECONFIG=/Users/user/.bluemix/plugins/container-service/clusters/<clustername>/kube-config-par01-<clustername>.yml
After exporting this environment variable we are able to use kubectl with the cluster:
$ kubectl get nodes
NAME             STATUS    ROLES     AGE       VERSION
10.126.120.232   Ready     <none>    9h        v1.7.4-1+1540c973d4ff9d

$ kubectl get pods --all-namespaces
NAMESPACE     NAME                                       READY     STATUS         RESTARTS   AGE
ibm-system    ibm-kube-fluentd-2l6mt                     0/1       ErrImagePull   0          9h
kube-system   calico-kube-controllers-3801899410-bt8lg   1/1       Running        0          9h
kube-system   calico-node-4g1js                          2/2       Running        0          9h
kube-system   docker-metrics-endpoint-chrvh              1/1       Running        0          9h
kube-system   heapster-4113300561-wqjb1                  2/2       Running        0          9h
kube-system   ibm-keepalived-watcher-2pnn8               1/1       Running        0          9h
kube-system   kube-dns-amd64-1619518705-kd93w            3/3       Running        0          9h
kube-system   kube-dns-amd64-1619518705-nz3tt            3/3       Running        0          9h
kube-system   kubernetes-dashboard-281344674-4wvs8       1/1       Running        0          9h
kube-system   vpn-3593056321-b9njd                       1/1       Running        0          9h
As you can see the core components are already installed and running. With the command kubectl proxy we can access the kubernetes dashboard on localhost:8001 and see more details about our cluster.
Deploy ingress
Now we are able to deploy our first application. In my case I first deployed an Nginx Ingress controller to have one ServiceEndpoint to access the applications running inside of the cluster:
curl https://raw.githubusercontent.com/kubernetes/ingress-nginx/master/deploy/namespace.yaml \
    | kubectl apply -f -

curl https://raw.githubusercontent.com/kubernetes/ingress-nginx/master/deploy/default-backend.yaml \
    | kubectl apply -f -

curl https://raw.githubusercontent.com/kubernetes/ingress-nginx/master/deploy/configmap.yaml \
    | kubectl apply -f -

curl https://raw.githubusercontent.com/kubernetes/ingress-nginx/master/deploy/tcp-services-configmap.yaml \
    | kubectl apply -f -

curl https://raw.githubusercontent.com/kubernetes/ingress-nginx/master/deploy/udp-services-configmap.yaml \
    | kubectl apply -f -

curl https://raw.githubusercontent.com/kubernetes/ingress-nginx/master/deploy/rbac.yaml \
    | kubectl apply -f -

curl https://raw.githubusercontent.com/kubernetes/ingress-nginx/master/deploy/with-rbac.yaml \
    | kubectl apply -f -
To make the ingress accessible from external we need to deploy a service that exposes the ingress via NodePort. In the Lite Plan Bluemix only supports NodePort method to export Ports of the cluster. In priced plans there is also a LoadBalancer type for services. Here is the yaml file needed to expose the ingress-nginx via NodePort:
kind: Service
apiVersion: v1
metadata:
  name: ingress-lb
  namespace: ingress-nginx
spec:
  selector:
    app: ingress-nginx
  type: NodePort
  ports:
  - name: "http"
    protocol: TCP
    port: 80
    targetPort: 80
    nodePort: 30080
  - name: "https"
    protocol: TCP
    port: 443
    targetPort:  443
    nodePort: 30443
Now we are able to access nodePort 30443 and 30080 from the www, therefore we need the ip address of our worker node. We can get this information by running the following command:
$ bx cs workers clustername
OK
ID                                                 Public IP     Private IP       Machine Type   State    Status   Version
kube-par01-pace57dc3cb1d4403fb99b5531e596b09d-w1   <public-ip>   <private-ip>     free           normal   Ready    1.7.4_1503
$ curl <public-ip>:30080
default backend - 404
Use the private docker-registry
Bluemix also provides a private docker registry to push images to and pull them from inside the cluster. To enable this the following commands must be executed:
$ bx plugin install container-registry -r Bluemix

Looking up 'container-registry' from repository 'Bluemix'...
Plug-in 'container-registry 0.1.235' found in repository 'Bluemix'
Attempting to download the binary file...
 20.96 MiB / 20.96 MiB [==========================================================================================================================================] 100.00% 51s
21978208 bytes downloaded
Installing binary...
OK
Plug-in 'container-registry 0.1.235' was successfully installed into /Users/user/.bluemix/plugins/container-registry. Use 'bx plugin show container-registry' to show its details.

$ bx cr namespace-add <namespace>
Adding namespace '<namespace>'...

Successfully added namespace '<namespace>'

OK

$ bx cr login

$ docker build -t registry.eu-gb.bluemix.net/<namespace>/api:latest .
$ docker push registry.eu-gb.bluemix.net/<namespace>/api:latest
The first command installs the container-registry plugin on our system. With the second command we create registry namespace where our containers live. To access the registry from docker we need to login then via bluemix. This will configure docker to allow authenticated connections to our private registry. Now we can build a docker container and push it to the reigstry.
To access the newly generated images in the private registry from inside the cluster we need to create a secret of type docker-registry with a username, email and the token to pull the image. The bluemix cli can return such a token easily with the following commands:
$ bx cr tokens
Getting registry tokens for account 'username's Account...

TOKEN ID                               READONLY   EXPIRY   DESCRIPTION
<uuid of token>                        true       0        testcluster

OK

$ bx cr token-get 7099b832-a431-583d-ac05-65c3ecab5537
Retrieving registry token with unique identifier '<uuid of token>'...

Token identifier   <uuid of token>
Token              <token-value>

OK
Now we can use the <token-value> to apply the pull secret to the kubernetes cluster:
kubectl --namespace <namespace> create secret docker-registry ibm-registry --docker-server=registry.eu-gb.bluemix.net --docker-username=token --docker-password=<token-value> --docker-email=<user-email>
With this docker-registry secret, we are now able to run our deployment on the cluster. Therefore we need to specify the imagePullSecret in the deployment:
apiVersion: apps/v1beta1
kind: Deployment
metadata:
  namespace: application
  name: api
  labels:
    app: api
spec:
  replicas: 1
  selector:
    matchLabels:
      app: api
  template:
    metadata:
      labels:
        app: api
    spec:
      containers:
      - name: api
        image: registry.eu-gb.bluemix.net/<namespace>/api:latest
        ports:
        - containerPort: 8080
      imagePullSecrets:
      - name: ibm-registry