Getting started with Knative Serving
Over the years, many serverless frameworks have been created that run on top of Kubernetes. There are for example kubeless, OpenFaas and Fission. The difference between all of them and Knative is, that Knative supported by major players in the enterprise, like RedHat, Pivotal, Google etc.
Knative itself is splitted into three parts:
- Build: Allows to easily build sources to container images in Kubernetes. It allows to easily define CI pipelines for source code and has many already defined build-templates.
- Serving: This is the serverless part that executes, scales and handles routing for Docker container. It can scale to zero and has a build in autoscaling functionality.
- Events: Allows to define subscription and delivery model to manage, send and receive events.
All the components of Knative are based on Istio and can be installed separate. So an already running Istio installation is required, alternative you can use the manifest files that Knative provides to deploy Istio.
In this tutorial we will look into the details of getting started with Serving.
Deploy Knative Serving to a Kubernetes Cluster
In my case I use a Kubernetes Cluster without LoadBalancer support for Services and I’m using also a newer version of Istio then described in the installation instructions for Knative Serving. This produces one failure that the installation of Knative watches for an Istio prometheus bridge that was removed in Release 1.0.3 of Istio. The following command will install Knative Serving and remove the prometheus bridge connection:
$ curl -L https://github.com/knative/serving/releases/download/v0.2.3/serving.yaml \
    | sed 's/LoadBalancer/ClusterIP/' \
    | sed '/nodePort:/d' \
    | sed '/--statsdUdpAddress/d' \
    | sed '/istio-statsd-prom-bridge/d' \
    | kubectl apply -f -
This will install the Knative Serving components in the knative-serving namespace:
$ kubectl get pods -n knative-serving
NAME                          READY   STATUS    RESTARTS   AGE
activator-db5b7fd87-2vq7b     2/2     Running   0          24h
activator-db5b7fd87-9xcgc     2/2     Running   0          24h
activator-db5b7fd87-xlpxd     2/2     Running   0          24h
autoscaler-5547f9f84d-zr8m8   2/2     Running   0          2d21h
controller-59465dfb58-plzfg   1/1     Running   0          2d21h
webhook-7bf4f5dc4-vmr6m       1/1     Running   0          2d21h
As you can see, it installs 4 different deployments in the knative-serving namespace that are required for knative-serving to run correctly. It also installs an ingress Gateway into the istio-system namespace.
Example application
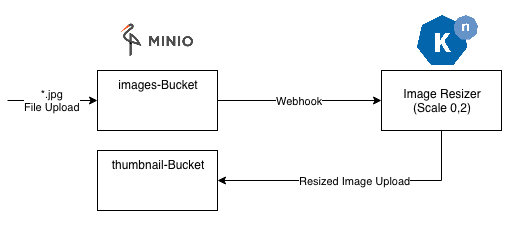
I’ve developed a small example application that receives Minio Webhooks when a new jpg file was uploaded to a bucket called images then it will generate a smaller version with a configurable scale factor and stores it again into another bucket called thumbnail in minio.
Deploy the example Application
The application is written in Java and has an endpoint called /webhook/image that receives POST messages with ImageEvents generated by Minio. To prepare the application I generated a Dockerfile that has an environment variable called PORT with a default value of 8080. This environment variable is provided by Knative and specifies on which port the application should listen for traffic.
Now we can simply deploy the application with the following manifest file:
apiVersion: v1
kind: Namespace
metadata:
  name: simple-serving
  labels:
    istio-injection: enabled
---
apiVersion: serving.knative.dev/v1alpha1
kind: Service
metadata:
  name: simple-serving-java
  namespace: simple-serving
spec:
  runLatest:
    configuration:
      revisionTemplate:
        metadata:
          annotations:
        spec:
          container:
            image: registry.gitlab.com/koudingspawn-public/knative/simple-serving-hello:latest
            env:
              - name: RESIZE_FACTOR
                value: "0.2"
            readinessProbe:
              exec:
                command:
                  - /bin/sh
                  - -c
                  - curl localhost:8081/actuator/health
              initialDelaySeconds: 10
              periodSeconds: 3
This manifest file generates a namespace called simple-serving and enables the Istio injection admission controller for this namespace. Then it applies a Knative Serving Service that specifies the Docker Image and a simple readiness Probe. To make it a bit more easier I use curl for health checks to bypass problems with Istio mtls and policies.
After this you should see, that there is a new Knative Service deployed to the Cluster:
$ kubectl get ksvc -n simple-serving
NAME                  DOMAIN                                           LATESTCREATED               LATESTREADY                 READY   REASON
simple-serving-java   simple-serving-java.simple-serving.example.com   simple-serving-java-00001   simple-serving-java-00001   True
The Knative Service is like a deployment only a high level resource, in the background Knative generated some additional resources:
- Configuration: Manages the desired state of the application.
- Revision: Each change to the application deployment information, like the environment variable or the used image will generate a new revision. It’s comparable with the ReplicaSet in case of a deployment.
- Route: Is responsible for routing network traffic to one or more revisions.
- Knative Pod Autoscaler (kpa): Is responsible for scaling based on capacity.
By default the Knative domain for incoming traffic through the Ingress Gateway in Istio is example.com. This domain consists of the Knative Service name and the namespace. With a simple curl to this domain we can now send traffic to our resizer-application. Therefore you must configure a dns entry that points to the newly generated Knative Ingress Gateway in the istio-system namespace. You can find the IP Address of the Service to point the dns entry to via the following command:
$ kubectl describe service -n istio-system knative-ingressgateway
Otherwise you can configure for Minio an extra /etc/hosts entry that points the dns entry to the ip of the knative-ingressgateway. Therefore you can simply use the hostAliases as described in the Kubernetes Documentation.
Deploy Minio
The deployment of Minio is very easy and strait forward, only the Webhook must be configured. Therefore please see line 12 of the minio deployment.yaml file. It points to the new generated Knative Service so the application will be informed about new files and their metadata. To allow the Application we deployed with Knative to communicate to Minio we must disable Istio MTLS for this Service, because we deployed Minio outside of Istio. Therefore please simply apply the following DestionationRule:
apiVersion: networking.istio.io/v1alpha3
kind: DestinationRule
metadata:
  name: "minio-ext"
  namespace: simple-serving
spec:
  host: "minio-service.minio.svc.cluster.local"
  trafficPolicy:
    tls:
      mode: DISABLE
This allows our application to communicate to minio without using mTLS.
As last step we must configure minio:
$ kubectl port-forward -n minio -l app=minio 9000:9000 &
$ mc config host add minio http://120.0.0.1:9000 minio minio123
$ mc mb minio/images
$ mc mb minio/thumbnail
$ mc event add minio/images arn:minio:sqs::1:webhook --event put --suffix .jpg
The third and fourth command generate two buckets called images and thumbnail and the last command creates the webhook for *.jpg files.
After this you can simply copy jpg files to the images bucket and a message is sent to our application to generate a resized version:
$ mc cp demo.jpg minio/images/demo.jpg
$ mc ls minio/thumbnail/
demo.jpg
Routing to different versions
The first resizer version generates a thumbnail with a size of 20% of the original file size. But what if we plan to resize only to 50% of the size and want to slowly migrate to the new version.
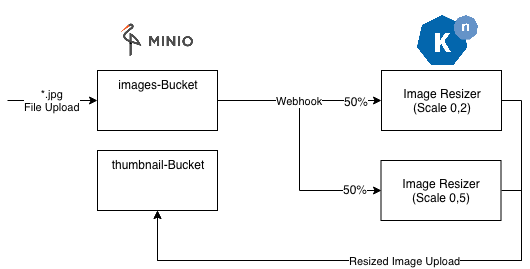
Therefore we can simply apply a new Knative Service version that routes 50% of the traffic to the new one and 50% of the minio events to our old revision:
apiVersion: serving.knative.dev/v1alpha1
kind: Service
metadata:
  name: simple-serving-java
  namespace: simple-serving
spec:
  release:
    revisions: ["simple-serving-java-00001", "simple-serving-java-00002"]
    rolloutPercent: 50
    configuration:
      revisionTemplate:
        metadata:
        spec:
          container:
            image: registry.gitlab.com/koudingspawn-public/knative/simple-serving-hello:latest
            env:
            - name: RESIZE_FACTOR
              value: "0.5"
            readinessProbe:
              exec:
                command:
                - /bin/sh
                - -c
                - curl localhost:8081/actuator/health
              initialDelaySeconds: 10
              periodSeconds: 3
The important parts are the “revisions” and the “rolloutPercent” parameters. The first revision in the array is the current version and the second one is the candidate version that receives 50% of the minio events and resizes images only to 50%.
$ kubectl get revision -n simple-serving
NAME                        SERVICE NAME                        READY   REASON
simple-serving-java-00001   simple-serving-java-00001-service   True
simple-serving-java-00002   simple-serving-java-00002-service   True
You can see this by simply running the following command:
$ kubectl get route -n simple-serving

apiVersion: serving.knative.dev/v1alpha1
kind: Route
metadata:
  creationTimestamp: "2018-12-23T21:29:27Z"
  generation: 11
  labels:
    serving.knative.dev/service: simple-serving-java
  name: simple-serving-java
  namespace: simple-serving
  ownerReferences:
  - apiVersion: serving.knative.dev/v1alpha1
    blockOwnerDeletion: true
    controller: true
    kind: Service
    name: simple-serving-java
spec:
  generation: 2
  traffic:
  - name: current
    percent: 50
    revisionName: simple-serving-java-00001
  - name: candidate
    percent: 50
    revisionName: simple-serving-java-00002
  - configurationName: simple-serving-java
    name: latest
    percent: 0
status:
  address:
    hostname: simple-serving-java.simple-serving.svc.cluster.local
  conditions:
  - lastTransitionTime: "2018-12-23T21:31:54Z"
    status: "True"
    type: AllTrafficAssigned
  - lastTransitionTime: "2018-12-23T21:29:57Z"
    status: "True"
    type: IngressReady
  - lastTransitionTime: "2018-12-23T21:31:54Z"
    status: "True"
    type: Ready
  domain: simple-serving-java.simple-serving.example.com
  domainInternal: simple-serving-java.simple-serving.svc.cluster.local
  traffic:
  - name: current
    percent: 50
    revisionName: simple-serving-java-00001
  - name: candidate
    percent: 50
    revisionName: simple-serving-java-00002
  - name: latest
    percent: 0
    revisionName: simple-serving-java-00002
Scaling based on capacity and scale ranges
By default Knative is configured to scale the application to zero if there is no traffic for several minutes (this parameter is configurable). That might produce cold start problems where the first call to a service will take very long, because the application has to start. To change this or how many replicas are maximal allowed you can simply add this two annotations:
apiVersion: serving.knative.dev/v1alpha1
kind: Service
metadata:
  name: simple-serving-java
  namespace: simple-serving
spec:
  runLatest:
    configuration:
      revisionTemplate:
        metadata:
          annotations:
            autoscaling.knative.dev/maxScale: "5"
            autoscaling.knative.dev/minScale: "1"
        spec:
          containerConcurrency: 2
          container:
            image: registry.gitlab.com/koudingspawn-public/knative/simple-serving-hello:latest
            env:
            - name: RESIZE_FACTOR
              value: "0.5"
            readinessProbe:
              exec:
                command:
                - /bin/sh
                - -c
                - curl localhost:8081/actuator/health
              initialDelaySeconds: 10
              periodSeconds: 3
Now the application won’t shutdown if there is no new traffic and will scaled to a max size of 5.
Additionally in this example a container Concurrency of two is configured, which means, that this container can handle two parallel requests. If there are more requests the autoscaler will resize the capacity of our application to handle the requests in parallel.