How to setup a bastion server
The idea of a bastion server is to secure instances from beeing available through the internet directly. Only the bastion server itself can be reached via an public ip through ssh port and accepts connections. The other servers only allow access to their ssh port via the bastion server and in best case they have no public ip.
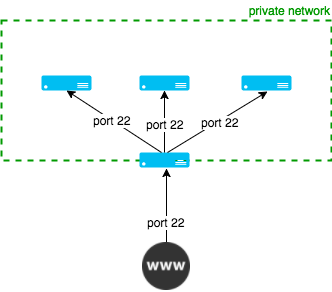
The following steps show how to setup a bastion server and a private network with instances that are only available over ssh via bastion server.
Steps
-
Create a bastion server with public and private ip address.
This can be performed easily be using the UI or by writing a short terraform script.
UI:
Create a new Droplet, select Ubuntu as Distribution choose your droplet size and region and after this selecting Private networking as option. As last step please select your SSH key to use.
Terraform:
 provider "digitalocean" {
     token = "${var.digitalocean_token}"
 }

 resource "digitalocean_droplet" "bastion" {
     image = "ubuntu-16-04-x64"
     name = "bastion"
     region = "fra1"
     size = "512mb"
     private_networking = true
     ssh_keys = [
         "${var.ssh_fingerprint}"
     ]
 }
This terraform script will generate the already described bastion server with Ubuntu 16.04 in region Frankfurt (fra1) with ssh_fingerprint. The ssh_fingerprint is defined as variable in the variables.tf file.
-
Setup a server to secure with firewall restrictions and private ip address that is only available via port 22 from bastion server.
On AWS for example it is possible to give an instance only a private ip. This is not possible on DigitalOcean, therefore we generate a Firewall that restricts traffic to instance.
UI:
Create the second Droplet, as described above. After this go to Networking>Firewalls and create your Firewall. The Inbound traffic must be limited to port 22 from the private ip address of your bastion host. So only SSH connections can be etablished from the bastion host. So please select Type SSH, Protocol TCP, Port Range 22 and Sources bastion_private_ip.
Terraform:
 resource "digitalocean_droplet" "private_server" {
     image = "ubuntu-16-04-x64"
     name = "private-server"
     region = "fra1"
     size = "512mb"
     private_networking = true
     ssh_keys = [
         "${var.ssh_fingerprint}"
     ]
 }

 resource "digitalocean_firewall" "private_network" {
     name = "private-network"
     droplet_ids = ["${digitalocean_droplet.private_server.id}"]

     inbound_rule = [
         {
         protocol = "tcp"
         port_range = "22"
         source_addresses = ["${digitalocean_droplet.bastion.ipv4_address_private}"]
         }
     ]

 }
The terraform script is the same as described in UI-Section. First create a droplet with name private-server and private_networking on true and after this create a firewall with name private-networking, that affects to the newly generated private_server by id and only allows inbound traffic via port 22 from private ip of the bastion server.
-
Configure ~/.ssh/config file to access instances in private network via bastion server
The last step is to configure your ssh connection to use the bastion server as Proxy to the private server or the private ip range.
 Host 138.197.177.12
     User root
     StrictHostKeyChecking no
     UserKnownHostsFile /dev/null
     LogLevel ERROR
     ServerAliveInterval 60
     IdentityFile ~/.ssh/id_rsa

 Host 10.135.46.*
     ProxyCommand ssh 138.197.177.12 -W %h:%p
     StrictHostKeyChecking no
     UserKnownHostsFile /dev/null
     LogLevel ERROR
     ServerAliveInterval 60
In the first part you see the bastion server with public ip 138.197.177.12. There we configure the user to root (default user on digitalocean instances) and the location of our private key (IdentityFile).
And in the second part we configure a wildcard for all private ips in the range of 10.135.46.* (Range will be another for your server) to use the bastion server as Proxy to connect to them.
With the following command you can now connect to the private instance
ssh [email protected].