Backup and Restore Kubernetes Resources with Heptio Ark
You may have had to perform a disaster recovery from your Kubernetes cluster in the past. Do you had a good backup strategy, that is easy to use and does not require days of work? Yes you can perform ETCD backups, but what if you lost only parts of your cluster, or you use persistent Volumes like AWS EBS?
The easiest way to do this is use Heptio Ark.
You can use Heptio to perform full backups, only backups of some namespaces or resource types or you can schedule backups to execute them periodically. And the key feature of Heptio Ark I think is the Integration into the different cloud providers like, AWS, Azure, Google Cloud etc. So if you perform backups, it also snapshots the used persistent volumes.
In the following post I’ll show how to install it and how to perform simple backups, scheduled backups and restore them. In my next post I’ll demonstrate how it also performs persistent volume backups.
Installation
The installation can be performed as described in the examples/README.md. It will generate some custom resource definitions, RBAC rules for heptio to create backups and the deployment. By default they are located in the heptio-ark namespace.
The important part, after installation was successful, is configuration of heptio-ark to tell the server on which cloud provider it is and where backups should be stored:
Here you can find the configuration, it can be simply applied via kubectl apply -f heptio.yaml
apiVersion: ark.heptio.com/v1
kind: Config
metadata:
  namespace: heptio-ark
  name: default
backupStorageProvider:
  name: aws
  bucket: heptio-backup-bucket
  config:
    region: eu-central-1
backupSyncPeriod: 30m
gcSyncPeriod: 30m
scheduleSyncPeriod: 1m
restoreOnlyMode: false
Now Heptio knows the bucket, where it’ll store backups. This backup location must be accessible from the heptio-server pods. Therefore you can use an instance profile that has access to the bucket. But you can also use Kube2IAM to use dynamic Instance Profiles on Pod basis.
The last step is downloading the Heptio Ark CLI from the release page on GitHub. This is required for performing backups, schedules and restore them. Most of the commands can also be performed as Custom Resource Definitions via YAML or JSON.
Perform Backups
In this short example I’ve generated a simple NGINX Deployment, with a Service in front of it in the namespace webserver:
$ kubectl get all
NAME           DESIRED   CURRENT   UP-TO-DATE   AVAILABLE   AGE
deploy/nginx   1         1         1            1           28s

NAME                  DESIRED   CURRENT   READY     AGE
rs/nginx-66f5756f9b   1         1         1         28s

NAME                        READY     STATUS    RESTARTS   AGE
po/nginx-66f5756f9b-c88ck   1/1       Running   0          28s

NAME        TYPE        CLUSTER-IP    EXTERNAL-IP   PORT(S)   AGE
svc/nginx   ClusterIP   10.32.0.183   <none>        80/TCP    28s
Now we create a Backup with the Heptio Ark CLI:
$ ark backup create nginx-simple --include-namespaces webserver
This will create only a backup of the webserver namespace. If you remove this parameter Heptio Ark will generate a complete backup of all resources in the Kubernetes Cluster. This backup can take some time and will be uploaded to the specified S3 Bucket (heptio-backup-bucket). You can see the status and a list of all performed backups with the following CLI command:
$ ark backup get
NAME                            STATUS      CREATED                          EXPIRES   SELECTOR
nginx-simple                    Completed   2018-07-08 17:35:09 +0200 CEST   29d       <none>
Here you can see, that the backup has been completed.
Restore Backups
Now we delete the namespace webserver:
$ kubectl delete ns heptio-test
To restore the namespace after it was accidentally deleted ;-) We use again the Heptio Ark CLI:
$ ark restore create --from-backup nginx-simple
Restore request "nginx-simple-20180708173924" submitted successfully.
Run `ark restore describe nginx-simple-20180708173924` for more details.
Now you should see, that the namespace has been recreated and all resources, in our case the deployment, the replicaset, the pod and the service are restored:
$ kubectl get all
NAME           DESIRED   CURRENT   UP-TO-DATE   AVAILABLE   AGE
deploy/nginx   1         1         1            1           20s

NAME                  DESIRED   CURRENT   READY     AGE
rs/nginx-66f5756f9b   1         1         1         20s

NAME                        READY     STATUS    RESTARTS   AGE
po/nginx-66f5756f9b-9mjvg   1/1       Running   0          20s

NAME        TYPE        CLUSTER-IP   EXTERNAL-IP   PORT(S)   AGE
svc/nginx   ClusterIP   10.32.0.77   <none>        80/TCP    20s
Structure of a backup
To see how a backup is structured you can simply download it from the S3 bucket or use the Heptio Ark CLI:
$ ark backup download nginx-simple
Backup nginx-simple has been successfully downloaded to $PWD/nginx-simple-data.tar.gz
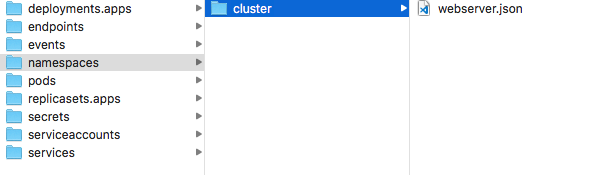
If we look inside the webserver.json of the backuped namespace we can see that it contains the normal namespace resource.
{
  "apiVersion":"v1",
  "kind":"Namespace",
  "metadata": {
    "annotations": {
      "kubectl.kubernetes.io/last-applied-configuration":"{\"apiVersion\":\"v1\",\"kind\":\"Namespace\",\"metadata\":{\"annotations\":{},\"name\":\"webserver\",\"namespace\":\"\"}}\n"
    },
    "creationTimestamp":"2018-07-08T15:26:44Z",
    "name":"webserver",
    "resourceVersion":"3364",
    "selfLink":"/api/v1/namespaces/webserver",
    "uid":"52698ae7-82c3-11e8-8529-0645eb60c3f4"
  },
  "spec": {
    "finalizers":["kubernetes"]
  },
  "status": {
    "phase":"Active"
  }
}
So in case of only a partial restore, we can use the Heptio Ark CLI to restore also only parts or we directly access the backup and restore the part via kubectl.
Run scheduled backups
Heptio Ark also performs scheduled tasks. Therefore we also define, which resources and namespaces should be included or excluded from backup and when the backup should be performed:
$ ark schedule create nginx-schedule --schedule="* 10 * * *" --include-namespaces webserver
Schedule "nginx-schedule" created successfully.
In this case the backup should be scheduled on 10h every day and only includes the namespace webserver. With Heptio Ark CLI you can see that the schedule is created and that Heptio Ark already performed the first backup run:
$ ark schedule get
NAME             STATUS    CREATED                          SCHEDULE       BACKUP TTL   LAST BACKUP   SELECTOR
nginx-schedule   Enabled   2018-07-08 17:49:00 +0200 CEST   * 10 * * *     720h0m0s     25s ago       <none>

$ ~/Downloads/ark backup get
NAME                            STATUS      CREATED                          EXPIRES   SELECTOR
nginx-schedule-20180708154900   Completed   2018-07-08 17:49:00 +0200 CEST   29d       <none>
nginx-simple                    Completed   2018-07-08 17:35:09 +0200 CEST   29d       <none>
You can see, that scheduled Backups will be deleted after 720h, which means 30 days. When you create a backup or a schedule you can also specify the TTL of the Backup. After the TTL of a backup is exceeded it will delete the Backup from your Storage Provider, in this case AWS.